Introduction to the Admin Interface
This is the first in a series of introductory tutorials created to provide a guide to learning about the basics of the Drupal administrative interface. This tutorial will provide an overview of the following topics:
Drupal Introduction
Terminology
Before diving in to the steps required to interact with Drupal interface, here are a few terms that you will hear and might wonder exactly they mean.
- Field: A field is a single item of information that the administrator can enter to be displayed on the website. Each field will have a form item that depends on the type of field. For example a text field would have a blank text box. An image field would have an upload button. A long text field would have its own WYSIWYG editor for entering a large amount of custom-formatted text. There are many different types of fields that can be used depending on the type of information that needs to be stored and displayed.
- Node: the information that you want to display on your website is stored as collections of fields. Each pre-defined collection of fields is referred to as the node. Usually one node refers to one "page" on your site, but often you will have a "page" that combines many nodes and only displays specific fields from those nodes. An easy example of this is a blog list page. Generally this page will list a bunch of individual blog posts by displaying a few fields from each post (or node). Lets say it displays the node title, maybe a thumbnail image, and a summary snippet of the blog body text. Clicking on the title will then take you to the full node where you will view the blog post in its entirety.
- Content Type: The developer of the site will create a collection of different types of nodes that will be custom built based on the exact information structure for the various nodes of your site. Each content type allows the administrator to create a node with its very own set of fields. For example, the "blog post" content type listed above would consist of a title field, an image field, and a body text field. Lets say for example your website has a portfolio section where each project in the portfolio would need a title, a slideshow, and a link to an external website. This would mean the developer would create a new content type that has the title field, a set of image fields large enough for your slideshow to have the number of slides that you require, and a link field that will accept a valid website URL.
Now that you know the main structural elements, lets take a look at how these are actually used within the admin interface to allow you to create the content for your website.
Administrator Login
Many websites will include a link to the login page as part of the design. If so, you only need to click on that link to access the login form. If not, you will need to remember the following url to access the login form:
yourwebsite.com/user
Now you will need to submit the login username and password provided to you by your developer to login to the system.

Once logged in you will have access to the administrator toolbar across the top of your website (as well as a few additional admin links throughout your site, depending on the activated options). The toolbar is broken into two levels. The top level (black bar) is the main navigation of the administration tasks. The second level (grey bar) is the list of customizable shortcut links. These should be pre-set to the common tasks by the developer, so hopefully you can simply rely on these links alone.
Creation of New Content
To add a new node to your site simply click on the "add content" link in the shortcut bar, shown above.
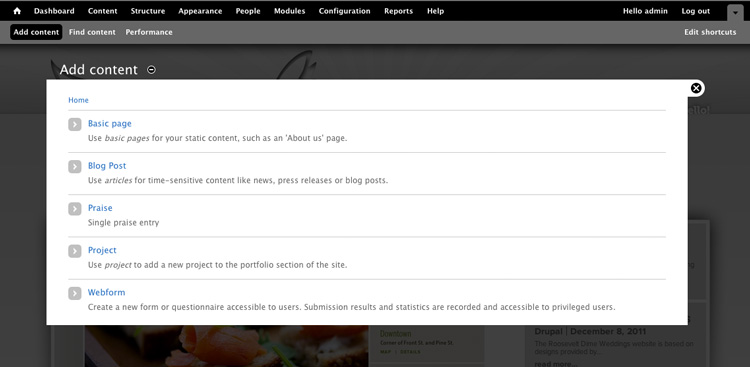
Now you should see an overlay page that lists the available content types to chose which type of content you would like to add. Clicking on the content type will open a new page with the available fields associated with that specific content type. Thus, each of these will be slightly different and unique to your website. For an example, lets look at the blog post type for this website.
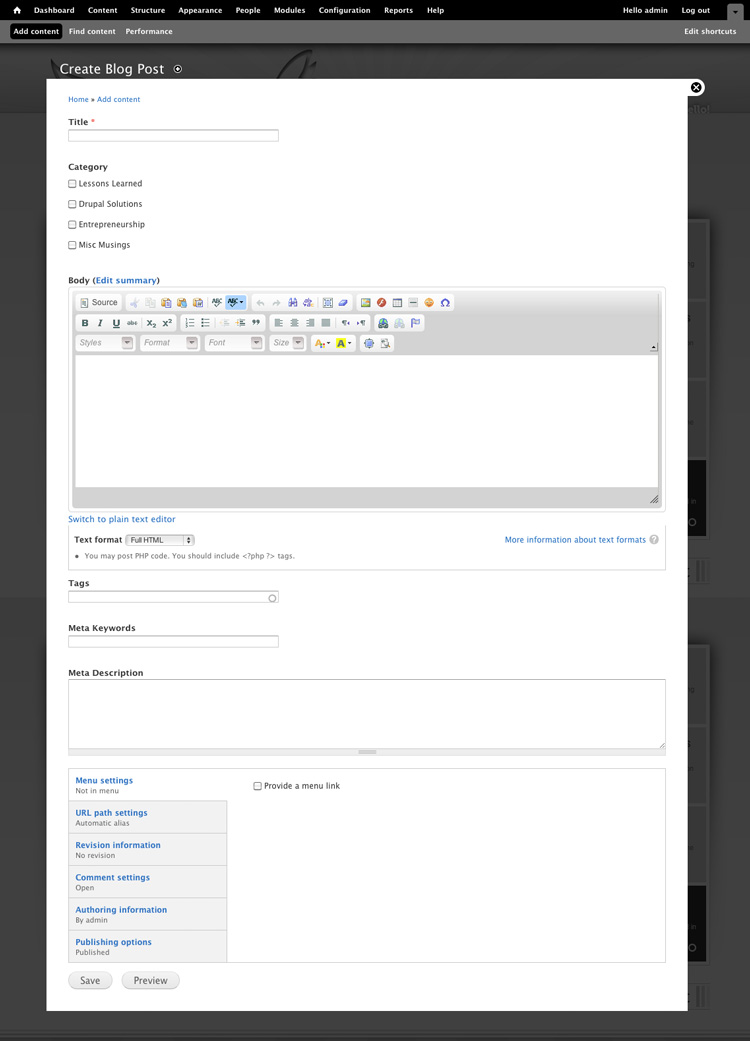
As you can see, my blog posts are defined by the following fields: title, category, body, and tags. The title field is required for all nodes in Drupal so you will always see this field. The category field is a set of predefined checkboxes that you can activate for each node. The body field is the large text area with WYSIWYG editor, and the tags are a list of auto-complete words that can be used to reuse existing tags or add new ones on the fly. Below these fields are the Meta tag fields and some additional options for more advanced customization of this node. To add a new blog post, simply fill out this form and submit it using the "Save" button. The blog post will be automatically added to the blog listing page.
Find and Edit Existing Content
To find a content node that has already been created on your site (so that you can update it or remove it), first click on the "Find content" link in the shortcut bar.
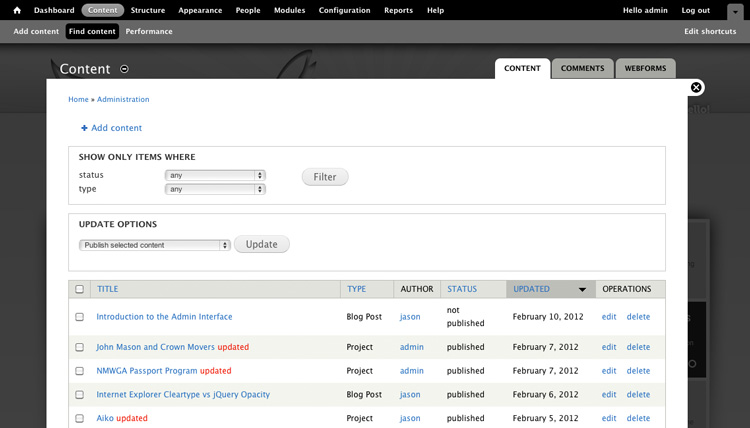
This overlay page gives you a list of all existing nodes within your website. At the beginning of development this list will be short and easy to look through and find your content listed by the node title. Once your website has been grown after a few dozen blog posts, it gets a little more difficult to find that needle in the haystack you are trying to update. Luckily, you are provided a few options to help locate the desired node. First, you can use the filter options at the top of the page to limit the list by published status and/or by content type. Using these options to display only "blog posts" that are currently unpublished is a common filter that I use. The other utility is the sorting by column options provided on the node list. You can select the column heading to resort the node list by that column. The default is by updated date so the most recently edited content is at the top. Usually this is helpful, but if you know the exact node title you are looking for, sorting by title will organize them alphabetically, which might save you some searching.
Once you locate the content you want to update, click on the "edit" link under the operations column on the right of the page. Clicking on the content title will actually take you to view that node directly, which is useful too, if you are just looking to find a certain page on your site to view it as a site visitor would.
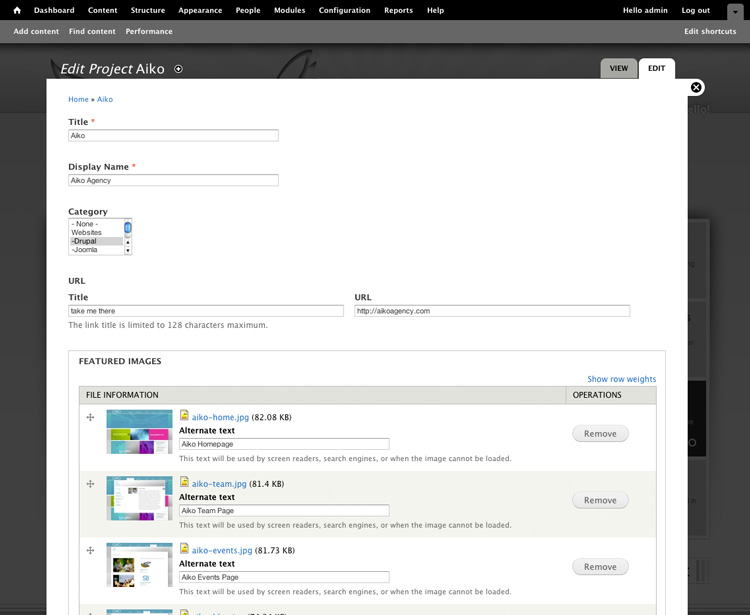
This example is for a project node titled "Aiko". As you can see, it looks very similar to the blog post node type, but with a different set of field options available. This node is already fully defined since I am only editing it from it's current status, so updating something is as simple as finding the field that needs to be updated, and either replacing the necessary text or image as needed.
Click "Save" at the bottom of the form when you are done, and voila!